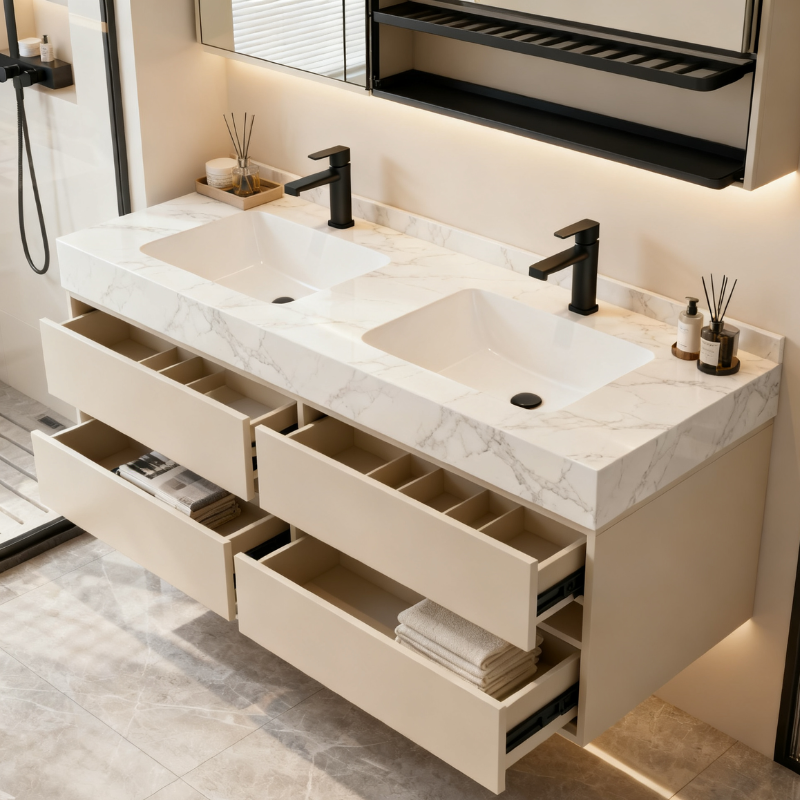
Floating Bathroom Vanity Wall‑Mounting Guidelines: Load‑Bearing, Wall Conditions & Installation Risks
Published: May 18, 2026
▼ Table of Contents (Click to expand)
Introduction
What Exactly Is a Floating (Wall‑Hung) Bathroom Vanity?
1.1 Core Characteristics
1.2 Typical Assembly Components
Why Wall Load‑Bearing Capacity Is Critical For Wall‑Hung Cabinets
2.1 Multiple Load Types You Need To Account For
Where Load Concentrates on a Floating Vanity Assembly
3.1 Rear Mounting Interface
3.2 Countertop and Sink Assembly
3.3 Front Cantilever Overhang Zone
3.4 Drawer and Internal Storage Compartments
3.5 Side Panels and Intermediate Reinforcement Zones
Can Drywall / Gypsum Board Alone Support Floating Bathroom Vanities?
4.1 Straight‑Forward Answer
4.2 Key Risks of Mounting Only To Drywall
4.3 Acceptable Base Wall Structures
Wall Stud Spacing & Core Installation Prerequisites
5.1 Common North‑American Stud‑On‑Center Dimensions
5.2 Installation Rules For Secure Mounting
5.3 Recommended Finished Installation Height
Proven Wall Reinforcement Solutions For Floating Vanities
6.1 Pre‑Installed Horizontal Wood Blocking Inside Wall Cavity
6.2 Continuous Metal Mounting Rail / French Cleat System
6.3 Upgraded Cabinet Rear Structural Reinforcement
6.4 Structural‑Grade Plywood Backer Panel
6.5 Specialised Fastener Kits For Concrete and Solid Brick Walls
6.6 Concealed Heavy‑Duty Auxiliary Metal Brackets
Size‑Based Reference Load Ratings For Floating Vanities
7.2 Why Design Load Must Exceed Real‑World Cabinet Weight
How Countertop and Basin Materials Change Wall Load Requirements
8.1 Performance Comparison Of Popular Countertop Materials
8.2 How Heavier Tops Impact Reinforcement Decisions
8.3 Load Differences Across Various Sink Basin Styles
Most Common Floating Vanity Installation Defects & Root Causes
9.1 Cabinet Front Sagging
9.2 Cabinet Pulling Away From Wall Surface
9.3 Wall Tile / Drywall Cracking Around Fixing Points
9.4 Drawer Operational Malfunctions
9.5 Countertop Cracks and Joint Separation
9.6 Loosening Screws and Mounting Hardware
Early Warning Signs Of Insufficient Wall Support
10.1 Observable Visual and Functional Red Flags
10.2 Conditions Requiring Immediate Professional Inspection
Manufacturer‑Sourced Practical Installation Advice
Tip 1: Complete Wall Structure Assessment Before Purchase
Tip 2: Avoid Generic Plastic Expansion Anchors For Wall‑Hung Vanities
Tip 3: Pre‑Plan Wall Reinforcement For Wide‑Size Cabinets
Tip 4: Pre‑Calculate Full Weight Including Countertop and Basins
Tip 5: Inspect Cabinet Rear Mounting Construction Quality
Tip 6: Distribute Fixing Points Widely Instead Of Concentrating Load
Tip 7: Levelness Check and Post‑Mounting Load Verification
Tip 8: Prevent Plumbing Interference With Mounting Surfaces
Tip 9: Apply Higher Safety Factor For Commercial Project Installations
Tip 10: Request Official Installation Specifications From Your Supplier
Complete Pre‑Installation Verification Checklist
12.1 Wall Structure Inspection Items
12.2 Product Pre‑Installation Check‑Points
12.3 On‑Site Installation Acceptance Criteria
Final Key Takeaways
Introduction
A floating bathroom vanity, also referred to as wall‑hung, wall‑mounted or wall‑hanging vanity, removes floor‑standing supports and transfers its entire weight onto building wall assemblies. Unlike freestanding bathroom cabinets that rest their full mass upon the floor, wall‑hung vanities depend entirely on wall framing, studs, backing materials, mounting rails, heavy‑duty bolts and reinforcement structures.
Many buyers only evaluate cabinet build quality and visual appearance. However, long‑term safe operation hinges on one critical question: can your wall safely sustain static dead weight, cantilever pull‑out forces, and recurring dynamic stress accumulated over years of bathroom usage. This article breaks down load‑bearing principles, wall‑reinforcement techniques, typical installation failures, pre‑purchase evaluation points and actionable checklists for homeowners, remodelers, importers and commercial project contractors.
1. What Exactly Is a Floating (Wall‑Hung) Bathroom Vanity?
A floating bathroom vanity is a wall‑affixed bathroom cabinet assembly with zero floor contact. Secure attachment is achieved by rear mounting plates, metal support brackets, continuous mounting rails and high‑strength bolt fasteners.
1.1 Core Characteristics
Open clearance underneath creates visually lighter modern aesthetics.
Floor space under cabinet stays fully accessible for quick cleaning.
Perfect match for minimalist, contemporary and light‑luxury bathroom design themes.
Creates perception of larger room volume within compact bathrooms.
Demands stricter wall structural performance and higher installation precision than freestanding alternatives.
1.2 Typical Assembly Components
Complete floating vanity packages normally contain cabinet box, countertop, sink basin, drawer or door hardware, rear mounting board, metal brackets or installation rail sets, wall fastener hardware plus water supply and drain connection fittings. The fundamental distinction versus freestanding cabinets lies in load transfer: every kilogram of mass transfers into wall construction, not onto bathroom flooring.
2. Why Wall Load‑Bearing Capacity Is Critical For Wall‑Hung Cabinets
Even a well‑manufactured floating vanity will develop serious defects when mounted onto an inadequately supporting wall. Common consequences include cabinet sagging, visible gaps opening between cabinet rear and wall, loose fasteners, wall surface cracking, uneven countertop planes, malfunctioning drawers, and in extreme scenarios total cabinet detachment from wall surfaces.
2.1 Multiple Load Types You Need To Account For
Numerous buyers only calculate cabinet self‑weight, yet walls must resist a combined mixture of static, storage‑derived, human‑induced and environmental loads.
Load Category | Practical Explanation |
|---|---|
Static Dead Load | Inherent weight of cabinet carcass, countertop, sink basin, faucet and factory‑installed hardware |
Storage Live Load | Mass of towels, toiletries, beauty appliances and cleaning supplies stored in drawers and cabinets |
Human‑Induced Pressure | Countertop leaning, hand‑resting pressure, children pulling drawer fronts or cabinet edges |
Recurring Dynamic Load | Thousands of open‑close drawer and cabinet door cycles plus accumulated material fatigue |
Cantilever Pull‑Out Force | Forward weight of cabinet depth creates constant outward tipping force pulling away from wall |
Humidity‑Driven Degradation | Long‑term bathroom moisture gradually reduces holding strength of anchors, wood panels and wall materials |
Suitable wall performance does not merely mean “holding the cabinet up on installation day”. It must sustain stable performance across many years of real‑world bathroom conditions.
3. Where Load Concentrates on a Floating Vanity Assembly
Weight distribution for floating vanities is uneven; several zones absorb the highest mechanical stress.
3.1 Rear Mounting Interface
This is the primary load‑transfer zone. Rear mounting boards, metal brackets or continuous mounting rails shift almost all cabinet stress into wall substrates. Any weakness in this connection point triggers tilting, sagging or outward deflection of the whole unit.
3.2 Countertop and Sink Assembly
Countertop plus basin frequently represent the heaviest individual portion of the finished floating vanity. Quartz, granite or ceramic integrated sink tops add substantial mass; dual‑basin configurations further amplify total load magnitude. Weight transfers via cabinet side panels, cross rails and rear mounting hardware to wall framing.
3.3 Front Cantilever Overhang Zone
Every inch of cabinet depth creates forward leverage effect. Heavier countertops plus heavily‑loaded internal storage magnify outward pull‑out and tipping stress applied to mounting points. Evaluating wall suitability cannot rely purely on vertical weight rating; anti‑pull‑out and anti‑sag performance are equally essential.
3.4 Drawer and Internal Storage Compartments
Fully‑loaded, fully‑extended drawers shift significant weight toward cabinet front edges. Each drawer opening event amplifies stress concentrated at wall mounting hardware. Large‑width deep drawers produce noticeably higher dynamic loading compared to shallow compact drawer layouts.
3.5 Side Panels and Intermediate Reinforcement Zones
Wide double‑sink cabinets (60‑inch, 72‑inch and larger sizes) concentrate stress at left‑right side panels, central divider frames, under‑sink support structures, countertop cut‑out regions and rear cross rails. Missing intermediate structural reinforcement leads to cabinet frame distortion or countertop cracking.
4. Can Drywall / Gypsum Board Alone Support Floating Bathroom Vanities?
4.1 Straight‑Forward Answer
Drywall or gypsum plasterboard must never act as the sole supporting substrate for floating bathroom vanities.
Drywall functions purely as interior wall finishing material, not as structural load‑bearing substrate. It can hold light‑weight decorative fixtures such as small mirrors or compact towel bars, yet lacks mechanical properties required for heavy cantilever‑style wall‑hung bathroom cabinetry.
4.2 Key Risks of Mounting Only To Drywall
Floating vanity assemblies combine cabinet mass, countertop weight, stored‑item load, human contact pressure, drawer‑cycling dynamic forces plus moisture‑related material degradation. Drywall exhibits poor pull‑out resistance, screws gradually work loose under recurring stress; humidity further weakens gypsum material. It cannot resist the outward cantilever pull‑out forces created by cabinet front overhang.
4.3 Acceptable Base Wall Structures
Floating vanity fasteners must anchor into one of these structural substrates: solid wood studs, properly reinforced metal studs, poured concrete walls, solid brick masonry, pre‑installed wood blocking, structural plywood backing or heavy‑duty metal support frames. Where you only have drywall surface available, internal wall reinforcement work is mandatory; ordinary plastic drywall anchors cannot serve as primary mounting hardware.
5. Wall Stud Spacing & Core Installation Prerequisites
5.1 Common North‑American Stud‑On‑Center Dimensions
Stud Spacing (On‑Center) | Metric Approximation | Application Notes |
|---|---|---|
16 inches OC | ~406 mm | Most‑common residential framing, superior load‑bearing performance |
24 inches OC | ~610 mm | Seen in some non‑load‑bearing partition wall builds |
“On‑Center” defines centre‑to‑centre distance between adjacent wall studs.
5.2 Installation Rules For Secure Mounting
Secure mounting points should engage no fewer than two structural wood studs.
Wide‑format cabinets require three or more anchoring stud positions.
Fasteners must fully penetrate cabinet rear mounting plate and embed sufficiently deep within solid stud material.
Horizontal wood blocking installed within wall cavity greatly simplifies alignment of mounting hardware.
Additional dedicated anchor points required for heavy‑stone countertop configurations.
Mounting rail hardware must maintain perfect horizontal level.
Wall substrate surface must remain flat; uneven surfaces introduce uneven stress distribution across cabinet frame.
5.3 Recommended Finished Installation Height
Industry typical finished installation height for floating bathroom vanities falls within 32–36 inches (813–914 mm). Exact final height depends on cabinet carcass height, countertop thickness, sink‑basin variant, primary‑user ergonomics, drain pipe routing positions and pre‑installed wall reinforcement vertical location. Incorrect vertical placement of pre‑built wall blocking creates major headaches during later cabinet installation.
6. Proven Wall Reinforcement Solutions For Floating Vanities
There is no universal one‑size‑fits‑all reinforcement solution. Design your wall upgrade based upon existing wall build‑up plus cabinet size and total assembly weight.
6.1 Pre‑Installed Horizontal Wood Blocking Inside Wall Cavity
Strongly recommended during new‑construction phases before wall board closing. Fit heavy‑duty horizontal lumber (2×6 or 2×8) or structural plywood between wall studs inside cavity space. Advantages: consistent reliable load‑bearing capacity; flexible mounting hole positioning; well‑suited for large‑size floating cabinets; reduces strict dependency on locating exact stud positions later; delivers excellent multi‑decade service‑life safety margins.
6.2 Continuous Metal Mounting Rail / French Cleat System
Long metal mounting rail distributes total cabinet load evenly across broader wall surface zones, improves levelling work during installation, allows minor left‑right positional adjustments. Important note: mounting rails still need to anchor firmly to structural studs or reinforced masonry substrates; mounting rails cannot be fixed purely onto drywall panels. Perfectly suited for volume commercial‑project batch installations.
6.3 Upgraded Cabinet Rear Structural Reinforcement
Reinforcement is not limited purely to building walls; cabinet product design itself also contributes to load handling. Quality floating vanity specifications include thicker rear mounting panels, solid‑wood or plywood rear cross rails, metal corner‑bracket bracing, concealed hanging hardware assemblies, rigid connections linking side‑panels to rear mounting structures, plus intermediate support dividers for wide‑width cabinets. Robust cabinet rear construction helps efficiently transfer assembly stress toward wall anchoring locations.
6.4 Structural‑Grade Plywood Backer Panel
When accurate stud alignment proves difficult, install full‑sheet structural‑grade plywood backing either inside wall cavity or mounted against wall surface. Highly recommended for large‑width floating cabinets, dual‑basin units, heavy stone countertops, hotel‑apartment commercial‑renovation projects and retrofit remodel scenarios.
6.5 Specialised Fastener Kits For Concrete and Solid Brick Walls
Concrete and solid brick masonry walls call for expansion bolts or chemical‑inject anchor systems matched to masonry material properties. Critical reminders: hollow brick partitions frequently deliver low holding strength; aged crumbling brickwork needs strength evaluation prior to mounting heavy cabinets; damp or powder‑degrading masonry substrates are unsuitable for direct heavy‑duty floating‑vanity mounting. Always select anchor hardware precisely matched to your wall material composition.
6.6 Concealed Heavy‑Duty Auxiliary Metal Brackets
For oversized cabinets, heavy‑weight stone countertops and large dual‑basin floating vanity builds, fit hidden auxiliary metal support brackets underneath or inside cabinet carcass. Ideal application for cabinets 60‑inch width and above, quartz / marble / granite tops, high‑usage hotel‑apartment commercial bathroom environments.
7. Size‑Based Reference Load Ratings For Floating Vanities
Table figures serve as general industry reference guidance. Final installation always must conform to official product manuals, actual wall‑condition inspection and local building‑code requirements.
Vanity Classification | Typical Width Range | Full Assembly Weight Approx. | Minimum Recommended Design Load Capacity | Suggested Wall Support Configuration |
|---|---|---|---|---|
Small Single‑Sink Vanity | 24‑30 inches / 610‑762 mm | 40‑80 kg | 100‑150 kg | Minimum two structural studs or solid masonry anchoring |
Medium Single‑Sink Vanity | 36‑42 inches / 914‑1067 mm | 70‑120 kg | 150‑200 kg | Two‑plus studs plus horizontal wood blocking reinforcement |
Medium‑Large Standard Cabinet | 48 inches /1219 mm | 90‑150 kg | 200‑250 kg | Two‑three studs together with rear‑panel structural upgrades |
Large Dual‑Basin Vanity | 60 inches /1524 mm | 120‑220 kg | 250‑350 kg | Three‑or‑more studs plus internal wall wood blocking |
Oversized Double‑Sink Unit | 72 inches /1829 mm and wider | 180‑300 kg+ | 350‑450 kg | Fully‑reinforced wall plus auxiliary metal bracket support preferred |
7.2 Why Design Load Must Exceed Real‑World Cabinet Weight
Wall‑mount engineering cannot calculate safety figures purely from measured cabinet self‑weight. You additionally account for stored‑item mass, countertop leaning forces, tipping leverage when drawers open, long‑term material fatigue, bathroom‑humidity degradation potential, on‑site installation tolerances and natural wall‑substrate ageing. General best‑practice rule: overall system design‑load capacity should reach at minimum twice the total finished assembly actual weight. For commercial projects, oversized cabinets or extra‑heavy stone countertops adopt even higher safety‑factor margins.
8. How Countertop and Basin Materials Change Wall Load Requirements
Very often the cabinet carcass itself is comparatively light; the dominant load originates from countertop plus sink‑basin assemblies.
8.1 Performance Comparison Of Popular Countertop Materials
Countertop Material | Relative Weight Burden | Required Wall Support Level | Suitability For Floating Vanity |
|---|---|---|---|
Ceramic Integrated Sink‑Top | Medium‑Heavy | Stable reinforced wall assembly required | Suitable; extra reinforcement mandatory for large sizes |
Quartz Engineered Stone | Heavy | Robust wall plus high‑grade mounting hardware | Suitable, mandatory reinforcement upgrades |
Natural Marble | Very Heavy | Extremely high wall‑load requirements | Works for premium projects, demands professional installation |
Granite Natural Stone | Very Heavy | High‑spec wall and bracket performance | Usable, avoid lightweight partition wall substrates |
Sintered Large‑Format Slab | Medium‑Heavy | Depends on slab thickness and structural build‑up | Well‑suited for contemporary floating‑vanity aesthetics |
Solid‑Surface Artificial Stone | Medium | Moderate wall requirements | Very favourable for wall‑hung vanity applications |
Timber / Wood Countertop | Light‑Medium | Lower wall‑stress loading | Acceptable, critical waterproof sealing mandatory |
Glass Countertop | Medium | Stable rigid mounting structure necessary | Less mainstream; implement comprehensive safety design |
8.2 How Heavier Tops Impact Reinforcement Decisions
Whenever you specify high‑mass countertop materials including quartz, marble or granite: avoid depending purely upon small standalone brackets; utilise wood‑blocking or structural plywood wall backing; ensure fixing points firmly engage structural wall studs; fit intermediate support positions for wide dual‑basin cabinets; guarantee uniform weight‑sharing between countertop and cabinet carcass; inspect levelness and wall‑gap behaviour immediately post‑installation.
8.3 Load Differences Across Various Sink Basin Styles
Basin Variant | Weight‑Related Influence |
|---|---|
Vessel Countertop Sink | Weight concentrates in discrete localised countertop zone |
Undermounted Sink | Higher structural demands around countertop cut‑out opening perimeter |
One‑Piece Integrated Basin | Overall mass concentrated but cabinet‑to‑top structural connection remains stable |
Dual‑Sink Layout | Significantly raises total assembly mass and overall wall‑mount stress |
Ceramic Sink Unit | Generally higher unit weight |
Resin / Artificial‑Stone Basin | Medium‑range weight characteristics |
9. Most Common Floating Vanity Installation Defects & Root Causes
Installation failures rarely stem from a single source. They emerge through combined shortcomings in wall‑substrate quality, cabinet rear‑structure design, hardware‑specification choices and field installation execution.
9.1 Cabinet Front Sagging
Observable symptoms: out‑of‑level countertop surface, cabinet front edge droops downwards, enlarged bottom drawer gaps, gaps opening at upper‑rear cabinet‑to‑wall seam. Typical causes: fasteners miss wall studs, insufficient wall load‑bearing capacity, overly‑short lag screws, excessively thin cabinet rear mounting plate, overweight countertop selection, deformed metal mounting rail.
9.2 Cabinet Pulling Away From Wall Surface
Visible gaps emerge along upper‑rear or side cabinet edges separating from wall finish. Root causes: high cantilever outward‑pulling leverage force, loose screws and brackets, drywall substrate tearing, insufficiently tightened mounting hardware, uneven original wall surface geometry.
9.3 Wall Tile / Drywall Cracking Around Fixing Points
Cracks appear surrounding screw holes, bracket outlines, cabinet upper‑region or tile grout seams. Common triggers: load stress concentrated within small surface zones, missing internal wall reinforcement, poor‑quality wall substrate, hollow‑backed wall tiles, incorrectly‑specified anchor hardware.
9.4 Drawer Operational Malfunctions
If cabinet mounting settles out‑of‑level you may experience self‑opening drawers, incomplete drawer closure, inconsistent left‑right front‑panel gaps, sliding‑rail noise, misaligned drawer fronts. These symptoms almost always signal uneven cabinet stress distribution or poor levelling during installation.
9.5 Countertop Cracks and Joint Separation
Absence of intermediate cabinet support for wide tops can produce cracking near sink cut‑out openings, fractures crossing countertop seams or adhesive joint delamination. Frequently reported for wide‑format dual‑basin floating vanity installations.
9.6 Loosening Screws and Mounting Hardware
Where fasteners only bite into drywall rather than structural stud / masonry substrate, hardware progressively loosens after repeated drawer‑cycling and long‑term static stress accumulation. This represents a serious safety warning condition.
10. Early Warning Signs Of Insufficient Wall Support
If you already own an installed floating vanity, periodically inspect for these risk indicators.
10.1 Observable Visual and Functional Red Flags
Cabinet unit begins tilting forward
Visible downward sagging of cabinet front edge
Progressive gaps appearing between cabinet rear and wall
Cracks radiating outward around screw‑hole locations
Hollow‑sounding or cracked wall tiles surrounding mounting zones
Cabinet assembly exhibits perceptible shaking / wobble under hand‑load
Countertop surface loses original level condition
Drawers self‑slide open without user input
Drawer front‑panel gaps gradually become uneven
Creaking noises originating at cabinet‑wall interface
Bracket and screw fasteners show signs of loosening
Deforming or buckling of cabinet rear mounting board
Clear downward droop visible on cabinet bottom‑front edge
10.2 Conditions Requiring Immediate Professional Inspection
Stop regular‑usage immediately when observing the following warning states: cabinet obvious wobble; continuously expanding wall‑surface cracks; steadily widening cabinet‑to‑wall separation gaps; cabinet movement triggered by drawer opening actions; countertop fracture appearance; centre‑section sagging on wide‑width cabinets. Remove heavy‑weight stored articles inside cabinet, reduce applied load, and arrange qualified tradesperson assessment of wall‑and‑mounting‑hardware integrity.
11. Manufacturer‑Sourced Practical Installation Advice
Tip 1: Complete Wall Structure Assessment Before Purchase Do not judge wall capability purely from finished tile or paint surface appearance. Wall substrate behind decorative finishes can vary widely. Common wall variants include wood‑stud drywall assemblies, metal‑stud partition walls, poured‑concrete, solid‑brick, hollow‑block masonry, lightweight partition assemblies and aged heritage‑building wall structures. Each distinct wall‑type requires dedicated fastening and reinforcement strategies.
Tip 2: Avoid Generic Plastic Expansion Anchors For Wall‑Hung Vanities Ordinary plastic expansion wall‑anchors suit lightweight picture‑hanging or small fixture mounting; they are inappropriate for multi‑year support of cantilever‑style floating‑vanity assemblies. Prefer wood‑stud‑compatible lag bolts, heavy‑duty toggle‑style anchors, metal expansion bolts, chemical injection masonry anchors, purpose‑built structural bracket systems, pre‑installed wood blocking and continuous metal mounting‑rail assemblies.
Tip 3: Pre‑Plan Wall Reinforcement For Wide‑Size Cabinets When cabinet width reaches 48 inches and upwards — especially 60‑inch and 72‑inch dual‑basin models — arrange wall‑cavity reinforcement during rough‑in construction phase. Avoid discovering insufficient wall‑load capacity only after wall tiling work is fully completed.
Tip 4: Pre‑Calculate Full Weight Including Countertop and Basins During purchasing phase, do not only focus on cabinet width dimension. Confirm cabinet carcass net‑weight, countertop material specification and thickness, sink‑basin material, single versus dual‑basin layout, complete packaged shipping‑weight and final fully‑assembled total‑weight. Quartz, marble and granite countertop variants impose substantially elevated wall‑strength prerequisites.
Tip 5: Inspect Cabinet Rear Mounting Construction Quality High‑quality floating vanity designs incorporate thickened rear mounting plates, robust dedicated mounting boards, horizontal load‑bearing cross rails, heavy‑duty metal brackets, plentiful distributed mounting holes, mechanically‑solid side‑panel‑to‑rear‑structure connections and dimension‑stable substrate materials. Even a perfectly‑reinforced wall cannot compensate for inadequately‑built cabinet rear‑mount hardware.
Tip 6: Distribute Fixing Points Widely Instead Of Concentrating Load Avoid concentrating total cabinet load upon only two isolated screw‑points. Best‑practice approaches utilise long continuous mounting rails, multiple distributed fastener locations, engagement across several wall‑stud positions, balanced left‑right load‑sharing, additional intermediate anchor‑points for wide cabinets and auxiliary hidden support brackets for heavy‑stone countertop variants.
Tip 7: Levelness Check and Post‑Mounting Load Verification Once installation finishes, verify cabinet horizontal level condition, countertop flatness, tight cabinet‑to‑wall seating, smooth drawer‑and‑door movement consistency, uniform door‑panel gaps, absence of wall‑surface cracking, cabinet wobble‑free rigidity, fully‑locked bracket fasteners, plus ensure drain‑supply pipe routing does not introduce unwanted physical pushing‑forces onto cabinet carcass.
Tip 8: Prevent Plumbing Interference With Mounting Surfaces Numerous installation‑failures trace back not to weak walls but poorly‑planned plumbing layouts. Common problems: drain pipe physically presses against drawer assemblies; supply piping prevents cabinet rear‑panel from sitting flush against wall; excessive cut‑outs for pipe‑routing degrade structural integrity of rear‑mounting board; installers remove sections of load‑bearing rail to clear pipe obstructions; cabinet cannot achieve full flat contact against wall substrate. All these scenarios degrade long‑term mounting stability.
Tip 9: Apply Higher Safety Factor For Commercial Project Installations Hotel‑rooms, apartment‑rental stock and public‑access bathrooms experience far‑higher‑frequency usage compared to private residential bathrooms. Commercial‑project best‑practice specifies higher safety‑margins for load‑rating, moisture‑resistant wall treatments, heavy‑spec mounting‑hardware, multi‑point‑distributed anchoring, formal documented installation‑inspection workflow and scheduled periodic maintenance‑check‑ups.
Tip 10: Request Official Installation Specifications From Your Supplier Buyers and project‑specifiers should collect these critical data points prior to ordering: cabinet carcass net‑weight; full‑assembly total‑weight after fitting countertop and sink; minimum wall‑substrate load‑rating requirement; requirement for direct stud‑anchoring; whether factory‑supplied mounting‑rail hardware is included; official recommendations for internal‑wall‑cavity reinforcement; cabinet rear‑bracket construction description; suitability for drywall‑only environments; installation guidance for concrete‑brick masonry walls; additional‑support‑needs for oversized cabinets; availability of printed installation manual plus laboratory‑validated load‑test documentation. Asking these technical questions early prevents costly on‑site installation complications.
12. Complete Pre‑Installation Verification Checklist
12.1 Wall Structure Inspection Items
Wall substrate type fully identified
Location and condition of wall‑stud framing confirmed
Wall surface free from dampness, hollow areas, powder‑degradation or cracking
Wall tiles firmly bonded without hollow‑sounding sections
Decision taken whether internal‑cavity wall‑reinforcement is necessary
12.2 Product Pre‑Installation Check‑Points
Cabinet carcass weight documented
Countertop and sink‑basin total‑weight confirmed
Single‑basin or dual‑basin configuration established
Cabinet rear‑mount‑plate and bracket‑hardware structural quality verified
Factory‑provided mounting‑rail / mounting‑board hardware present
Mounting‑hole layout positions are technically reasonable
12.3 On‑Site Installation Acceptance Criteria
Fasteners anchor securely into structural studs or solid masonry substrate
Selected fastener hardware matches wall‑substrate material
Screw‑lag fastener length meets penetration‑depth specifications
Mounting rail assembly maintains perfect horizontal level
Cabinet rear sits flush against wall‑surface without gaps
Drawers and cabinet‑doors operate smoothly and consistently
Zero perceptible cabinet wobble or play
Final post‑installation load‑bearing verification test completed
13. Final Key Takeaways
Four core principles summarise wall‑load requirements for floating bathroom vanities:
First, floating‑wall‑hung bathroom vanities must never rely purely upon drywall / gypsum‑board for structural holding power. Drywall functions purely as finishing cladding. All mounting hardware must anchor to wood‑stud framing, concrete‑brick masonry or purpose‑installed reinforced wall‑backing substrates.
Second, wall‑mount systems must resist far more weight than cabinet self‑weight alone. Countertop‑sink mass, stored‑item live‑load, human‑contact‑forces, drawer‑cycling dynamic‑stress and long‑term humid‑bathroom environmental degradation all increase real‑world system loading.
Third, wider‑width cabinets plus heavy‑weight stone countertops demand upgraded‑grade wall‑reinforcement measures. Especially for cabinets starting at 48‑inch width, 60‑inch dual‑basin units and oversized 72‑inch models, utilise internal wood‑blocking, structural‑plywood backing panels, continuous metal mounting‑rails and concealed auxiliary support‑brackets where conditions permit.
Fourth, correct installation execution is equally as important as selecting a well‑built vanity cabinet. Even premium‑quality wall‑hung cabinets will sag, crack, loosen or detach if fitted onto unsuitable wall substrates or using incorrect fastener‑hardware.
From professional manufacturing‑industry perspective, safe floating‑vanity installation follows this guiding principle: Assess wall condition first; calculate complete assembly weight second; complete wall‑reinforcement before cabinet mounting; guarantee structural‑safety before prioritising visual‑aesthetic outcomes.